In the previous article, we discussed inserting, updating, and deleting data in MVC without Entity Framework. In this post, we will implement insert, update, and delete (CRUD operations) functionality in MVC using Entity Framework with AJAX calls and jQuery.
If you're also looking for performing listing, inserting, updating, and deleting in a single view in ASP.NET MVC, you've come to the right place. In this post, we will demonstrate CRUD operations in a single view in MVC5 with the help of a Bootstrap modal popup. This means we will utilize a Bootstrap modal popup for performing CRUD operations in this article.
We will cover the following point in this post
- CRUD operations in MVC using bootstrap modal popup
- Insert, update, delete i. e Crud operations using jquery ajax and modal
- Crud operation in MVC using the jquery data table
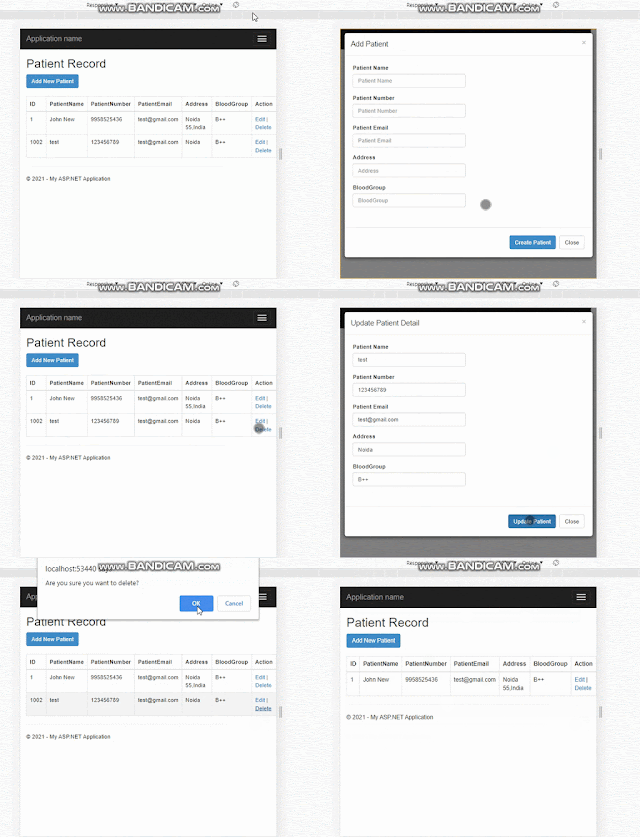
So, let's begin step by step to learn how easily we can accomplish this task in any project. We will create a basic view where users can see all the lists of records in a table. It will include an 'Add' button for adding new database records, an 'Edit' button for updating existing database records, and 'Delete' links to remove any existing records with a confirmation alert box.
we have divided the entire article into the following parts.
- Creating New ASP.NET MVC Project for our task
- Creating Database Table for performing database operations
- Adding Connection EntityFramework in our project
- Creating Controller
- Adding Action Method in Controller
- Creating View from Action Method
- Configure RouteConfig.cs file
- Run your Project
Step 1- Create New ASP.NET MVC Project

Step 2- Creating Database Table for performing database operations
Let's create the database table for our CRUD operation. I've created a table called TblPatient with columns: Id, PatientName, PatientNumber, PatientEmail, Address, and BloodGroup. Below is the SQL script of the table that you can use for testing purposes.
CREATE TABLE [dbo].[TblPatient](
	[Id] [int] IDENTITY(1,1) NOT NULL,
	[PatientName] [nvarchar](250) NULL,
	[PatientNumber] [nvarchar](100) NULL,
	[PatientEmail] [nvarchar](150) NULL,
	[Address] [nvarchar](500) NULL,
	[BloodGroup] [nvarchar](100) NULL,
    CONSTRAINT [PK_TblPatient] PRIMARY KEY CLUSTERED
(
	[Id] ASC
)
) ON [PRIMARY]
Step 3- Adding Connection EntityFramework in our project
Try the below step and follow the image diagram if you are new to the entity framework.
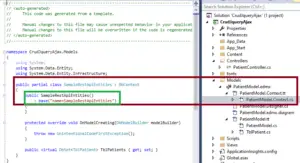
Right-click on the Model folder and select add a new item =>select Ado .net entity data model from the option and perform the steps described in the below image.

It will create a model class for the table(representing the database table structure) which we will use as Model Class for the View.

Open TblPatient.cs you can see the model class
namespace CrudJqueryAjax.Models
{
using System;
using System.Collections.Generic;

public partial class TblPatient
    {
public int Id { get; set; }
public string PatientName { get; set; }
public string PatientNumber { get; set; }
public string PatientEmail { get; set; }
public string Address { get; set; }
public string BloodGroup { get; set; }
    }
}
Step 4. Creating Controller
Now let’s add a controller for performing database operation, Right-click on the Controller folder in the project and click on add an empty controller.I have created controller with Patient named.

using System;
using System.Collections.Generic;
using System.Linq;
using System.Web;
using System.Web.Mvc;

namespace CrudJqueryAjax.Controllers
{
public class PatientController : Controller
    {
// GET: Patient
public ActionResult Index()
        {
return View();
        }
    }
}
Step 5. Adding Action Method in Controller
Now let’s write the logic in our controller, Open PatientController, and add the following action methods. Here, I am going to add five action methods to our controller
- For returning Index view which shows the list of patients- Index()
- Returning All Patient list in the database- GetPatientList()
- Returning single record from database By Id- GetPatientbyID()
- Action for creating the record in the database– AddPatient()
- For Updating records in the database– UpdatePatient()
- For deleting a record in the database– DeletePatient ()
PatientController.CS
using CrudJqueryAjax.Models;
using System;
using System.Collections.Generic;
using System.Data.Entity;
using System.Linq;
using System.Web;
using System.Web.Mvc;

namespace CrudJqueryAjax.Controllers
{
public class PatientController : Controller
    {
// GET: Patient
private SampleRestApiEntities db = new SampleRestApiEntities();

// GET: Patient
public ActionResult Index()
        {
return View();

        }
public JsonResult GetPatientList()
        {
return Json(db.TblPatients.ToList(), JsonRequestBehavior.AllowGet);
        }
public JsonResult AddPatient(TblPatient tblPatient)
        {
string status = "success";
try
            {
                db.TblPatients.Add(tblPatient);
                db.SaveChanges();
            }
catch(Exception ex)
            {
                status = ex.Message;
            }
return Json(status, JsonRequestBehavior.AllowGet);

        }
public JsonResult GetPatientbyID(int PatientId)
        {
try
            {
var Patient = db.TblPatients.Where(a => a.Id == PatientId).FirstOrDefault();
return Json(Patient, JsonRequestBehavior.AllowGet);
            }
catch(Exception ex)
            {
return Json(null, JsonRequestBehavior.AllowGet);
            }


        }
public JsonResult UpdatePatient(TblPatient tblPatient)
        {

string status = "success";
try
            {
                db.Entry(tblPatient).State = EntityState.Modified;
                db.SaveChanges();

            }
catch (Exception ex)
            {
                status = ex.Message;

            }
return Json(tblPatient, JsonRequestBehavior.AllowGet);
        }
public JsonResult DeletePatient(int PatientId)
        {
string status = "success";
try
            {

var pateint = db.TblPatients.Find(PatientId);
                db.TblPatients.Remove(pateint);
                db.SaveChanges();

            }
catch (Exception ex)
            {
                status = ex.Message;

            }
return Json(status, JsonRequestBehavior.AllowGet);
        }
protected override void Dispose(bool disposing)
        {
if (disposing)
            {
                db.Dispose();
            }
base.Dispose(disposing);
        }
    }
}
PatientController
- Index(): This method returns a view, likely for displaying a list of patients.
- GetPatientList(): Returns a JsonResult containing a list of all patients from the database.
- AddPatient(TblPatient tblPatient): Receives a TblPatient object as a parameter, attempts to add it to the database, and returns a JsonResult indicating success or failure.
- GetPatientByID(int PatientId): Retrieves a patient from the database based on the provided ID and returns it as a JsonResult.
- UpdatePatient(TblPatient tblPatient): Receives a TblPatient object as a parameter, updates it in the database, and returns a JsonResult indicating success or failure.
- DeletePatient(int PatientId): Deletes a patient from the database based on the provided ID and returns a JsonResult indicating success or failure.
- Dispose(bool disposing): Overrides the Dispose method to release resources when the controller is disposed.
The controller utilizes Entity Framework to interact with the database (assuming SampleRestApiEntities is a DbContext). It follows the CRUD (Create, Read, Update, Delete) pattern for managing patient records.
SampleRestApiEntities is entity framwork DbContext object you can find name in web.config or context.cs file

6. Creating View from Action Method
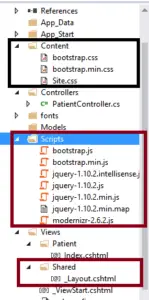
Now Right-click on Index ActionMethod, add empty View, please make sure to check “Use a Layout page” option. it will create the layout and Bootsrap files for our project.

Now Open Index.cshtml and Copy paste the below code
Index.cshtml
@{
    ViewBag.Title = "Index";
}
<h2>Patient Record</h2>
@* Table for showing the list of Records from the database *@
<button type="button" class="btn btn-primary" data-toggle="modal" data-target="#myModal" onclick="OpenAddPopup();">Add New Patient</button><br /><br />
<table class="table table-bordered table-hover">
    <thead>
        <tr>
            <th>
                ID
            </th>
            <th>
                PatientName
            </th>
            <th>
                PatientNumber
            </th>
            <th>
                PatientEmail
            </th>
            <th>
                Address
            </th>
            <th>
                BloodGroup
            </th>
            <th>
                Action
            </th>
        </tr>
    </thead>
    <tbody class="tbody"></tbody>
</table>

@*BootsTrap Model Popup for Adding and Updating the  Patient Record *@
<div class="modal fade" id="AddUpdateModel" tabindex="-1" role="dialog" aria-labelledby="myModalLabel" aria-hidden="true">
    <div class="modal-dialog">
        <div class="modal-content">
            <div class="modal-header">
                <button type="button" class="close" data-dismiss="modal">×</button>
                <h4 class="modal-title" id="AddUpdateModelLabel">Add Patient</h4>
            </div>
            <div class="modal-body">
                <form>
                    @* hidden filed for storing Id *@
                    <input type="hidden" id="hfpatientId" />
                    <div class="form-group">
                        <label for="txtPatientName">Patient Name</label>
                        <input type="text" class="form-control" id="txtPatientName" placeholder="Patient Name" />
                    </div>
                    <div class="form-group">
                        <label for="txtPatientNumber">Patient Number</label>
                        <input type="text" class="form-control" id="txtPatientNumber" placeholder="Patient Number" />
                    </div>
                    <div class="form-group">
                        <label for="txtPatientEmail">Patient Email</label>
                        <input type="email" class="form-control" id="txtPatientEmail" placeholder="Patient Email" />
                    </div>
                    <div class="form-group">
                        <label for="txtAddress">Address</label>
                        <input type="text" class="form-control" id="txtAddress" placeholder="Address" />
                    </div>
                    <div class="form-group">
                        <label for="txtBloodGroup">BloodGroup</label>
                        <input type="text" class="form-control" id="txtBloodGroup" placeholder="BloodGroup" />
                    </div>
                </form>
            </div>
            <div class="modal-footer">
                <button type="button" class="btn btn-primary" id="btnAddpatient" onclick="return AddPatient();">Create Patient</button>
                <button type="button" class="btn btn-primary" id="btnUpdatepatient" style="display:none;" onclick="UpdatePatient();">Update Patient</button>
                <button type="button" class="btn btn-default" data-dismiss="modal">Close</button>
            </div>
        </div>
    </div>
</div>
<script src="~/Scripts/jquery-1.10.2.min.js"></script>
<script src="~/Scripts/bootstrap.min.js"></script>


<script type="text/javascript">
//Load Data in Table when documents is ready
    $(document).ready(function () {
        BindpatientData();
    });

//Bind Data function which is responoisble for loading all data from database
    function BindpatientData() {
        $.ajax({
            url: "/Patient/GetPatientList",
            type: "GET",
            contentType: "application/json;charset=utf-8",
            dataType: "json",
            success: function (result) {
if (result) {
//itetrate thorugh each record and bind it to td
var html = '';
                    $.each(result, function (key, item) {
                        html += '<tr>';
                        html += '<td>' + item.Id + '</td>';
                        html += '<td>' + item.PatientName + '</td>';
                        html += '<td>' + item.PatientNumber + '</td>';
                        html += '<td>' + item.PatientEmail + '</td>';
                        html += '<td>' + item.Address + '</td>';
                        html += '<td>' + item.BloodGroup + '</td>';
                        html += '<td><a href="#" onclick="return OpenEditPopup(' + item.Id + ')">Edit</a> | <a href="#" onclick="DelelePatient(' + item.Id + ')">Delete</a></td>';
                        html += '</tr>';
                    });
                    $('.tbody').html(html);
                }

            },
            error: function (errormessage) {
                alert(errormessage.responseText);
            }
        });
    }

//************Adding Record in the database***********


    function OpenAddPopup() {
//title text
        $("#AddUpdateModelLabel").text("Add Patient")
//clear all input
        ClearAllInput();
//open popup
        $('#AddUpdateModel').modal('show');
//show add patient button and hide update button
        $('#btnUpdatepatient').hide();
        $('#btnAddpatient').show();
    }

//Add Data Function
    function AddPatient() {
var res = ValidateUserInput();
if (res == false) {
return false;
        }
var patientObj = {
            Id: $('#hfpatientId').val(),
            PatientName: $('#txtPatientName').val(),
            PatientNumber: $('#txtPatientNumber').val(),
            PatientEmail: $('#txtPatientEmail').val(),
            Address: $('#txtAddress').val(),
            BloodGroup: $('#txtBloodGroup').val(),
        };
        $.ajax({
            url: "/Patient/AddPatient",
            data: JSON.stringify(patientObj),
            type: "POST",
            contentType: "application/json;charset=utf-8",
            dataType: "json",
            success: function (result) {
//populate table with new record
                BindpatientData();
//claer all input and hide model popup
                ClearAllInput();
                $('#AddUpdateModel').modal('hide');
            },
            error: function (errormessage) {
                alert(errormessage.responseText);
            }
        });
    }


    function OpenEditPopup(PatienId) {
        $("#AddUpdateModelLabel").text("Update Patient Detail")
        ClearAllInput();
        $.ajax({
            url: "/Patient/GetPatientbyID?PatientId=" + PatienId,
            typr: "GET",
            contentType: "application/json;charset=UTF-8",
            dataType: "json",
            success: function (result) {
                debugger;
                $("#AddUpdateModelLabel").val("Update Patient Detail")
                $('#hfpatientId').val(result.Id);
                $('#txtPatientName').val(result.PatientName);
                $('#txtPatientNumber').val(result.PatientNumber);
                $('#txtPatientEmail').val(result.PatientEmail);
                $('#txtAddress').val(result.Address);
                $('#txtBloodGroup').val(result.BloodGroup);

                $('#AddUpdateModel').modal('show');
                $('#btnUpdatepatient').show();
                $('#btnAddpatient').hide();
            },
            error: function (errormessage) {
                alert(errormessage.responseText);
            }
        });
return false;
    }

//function for updating Patient record
    function UpdatePatient() {
var res = ValidateUserInput();
if (res == false) {
return false;
        }
var patientObj = {
            Id: $('#hfpatientId').val(),
            PatientName: $('#txtPatientName').val(),
            PatientNumber: $('#txtPatientNumber').val(),
            PatientEmail: $('#txtPatientEmail').val(),
            Address: $('#txtAddress').val(),
            BloodGroup: $('#txtBloodGroup').val(),
        };
if (!patientObj.Id || patientObj.Id<= 0) {
            alert("Invalid Id!");
return false;
        }
        $.ajax({
            url: "/Patient/UpdatePatient",
            data: JSON.stringify(patientObj),
            type: "POST",
            contentType: "application/json;charset=utf-8",
            dataType: "json",
            success: function (result) {
                BindpatientData();
                ClearAllInput();
            },
            error: function (errormessage) {
                alert(errormessage.responseText);
            }
        });
    }


//function for deleting employee's record
    function DelelePatient(ID) {
var ans = confirm("Are you sure you want to delete?");
if (ans) {
            $.ajax({
                url: "/Patient/DeletePatient?PatientId=" + ID,
                type: "POST",
                contentType: "application/json;charset=UTF-8",
                dataType: "json",
                success: function (result) {
                    BindpatientData();
                },
                error: function (errormessage) {
                    alert(errormessage.responseText);
                }
            });
        }
    }

    function ClearAllInput() {
        $('#AddUpdateModel').modal('hide');
        $('#hfpatientId').val("");
        $('#txtPatientName').val("");
        $('#txtPatientNumber').val("");
        $('#txtPatientEmail').val("");
        $('#txtAddress').val("");
        $('#txtBloodGroup').val("");

        $('#txtPatientName').css('border-color', 'lightgrey');
        $('#txtPatientNumber').css('border-color', 'lightgrey');
        $('#txtPatientEmail').css('border-color', 'lightgrey');
        $('#txtAddress').css('border-color', 'lightgrey');
        $('#txtBloodGroup').css('border-color', 'lightgrey');
    }
    function ValidateUserInput() {
var isValid = true;
if ($('#txtPatientName').val().trim() == "") {
            $('#txtPatientName').css('border-color', 'Red');
            isValid = false;
        }
else {
            $('#txtPatientName').css('border-color', 'lightgrey');
        }
if ($('#txtPatientNumber').val().trim() == "") {
            $('#txtPatientNumber').css('border-color', 'Red');
            isValid = false;
        }
else {
            $('#txtPatientNumber').css('border-color', 'lightgrey');
        }
if ($('#txtPatientEmail').val().trim() == "") {
            $('#txtPatientEmail').css('border-color', 'Red');
            isValid = false;
        }
else {
            $('#txtPatientEmail').css('border-color', 'lightgrey');
        }
if ($('#txtAddress').val().trim() == "") {
            $('#txtAddress').css('border-color', 'Red');
            isValid = false;
        }
else {
            $('#txtAddress').css('border-color', 'lightgrey');
        }

if ($('#txtBloodGroup').val().trim() == "") {
            $('#txtBloodGroup').css('border-color', 'Red');
            isValid = false;
        }
else {
            $('#txtBloodGroup').css('border-color', 'lightgrey');
        }
return isValid;
    }
</script>- Table for Patient Records: table displays patient records fetched from the database. It includes columns for ID, PatientName, PatientNumber, PatientEmail, Address, BloodGroup, and an additional column for actions (Edit and Delete).
- Add New Patient Button: button triggers a Bootstrap modal popup for adding a new patient record. It is styled with Bootstrap classes and contains an onclick event to execute the OpenAddPopup() JavaScript function.
- Bootstrap Modal Popup for Adding and Updating Patient Records: modal popup provides input fields for adding or updating patient records. It includes fields for Patient Name, Patient Number, Patient Email, Address, and Blood Group. It also includes buttons for creating or updating a patient record, as well as a button to close the modal.
- JavaScript Functions: These functions utilize AJAX to interact with the server-side controller methods for CRUD operations:
- BindpatientData(): Retrieves patient data from the server and populates the table with it.
- OpenAddPopup(): Clears input fields and opens the modal popup for adding a new patient record.
- AddPatient(): Validates user input, sends the data to the server for adding a new patient record, and updates the table with the new record.
- OpenEditPopup(PatientId): Clears input fields, retrieves the details of a patient record based on its ID, and opens the modal popup for updating the record.
- UpdatePatient(): Validates user input, sends the updated data to the server for updating a patient record, and refreshes the table with the updated record.
- DelelePatient(ID): Confirms deletion of a patient record and sends a request to the server to delete it.
- ClearAllInput(): Clears all input fields and hides the modal popup.
- ValidateUserInput(): Validates user input for required fields and highlights any missing inputs.
This view provides a user interface for managing patient records with features for adding, editing, and deleting records using AJAX requests to communicate with server-side controller methods.
Step 7- Configure RouteConfig.cs file
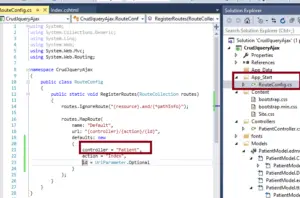
Open RouteConfig.cs file inside App_Start folder and Change in controller name from Home=>Patient
because when we want to open the index view inside the Patient controller at the start of the application.

Now Build project and run in the browser
Why we should use Bootstrap in Mvc?
Bootstrap is a framework that we can usually use to quickly design any website. Bootstrap consists of pre-written CSS and JavaScript files in which many classes are pre-defined. These classes are used to make typography, HTML forms, pages responsive. Websites created in Bootstrap are more attractive and faster.
today, Almost all types of websites are being built in Bootstrap. If you are interested in web designing, this is a very important Javascript framework for any web designer. Which is used to design lightweight and mobile-friendly websites.
Bootstrap is the most popular HTML, CSS, and JavaScript framework for developing a responsive and mobile-friendly website. It is absolutely free to download and use. It is a front-end framework used for easy and fast web development.
Bootstrap was created by employees of the Twitter company Mark Otto and Jacob Thornton together with one of their teams. Here we would like to tell you for your information that in the beginning, they named it Twitter Blueprint because they wanted to use it as an internal tool for Twitter, and this was the main reason for developing it.
But later it was released on 19 August 2011 as an open-source project under the name of Bootstrap on GitHub. So that more people could use it, it became very popular as soon as it was seen and today developers from all over the world use it to design responsive websites.
If you use it through CDN, then it is very easy. But to use Bootstrap, you must have basic knowledge of HTML and CSS.
To use Bootstrap, you need to add the CDN of Bootstrap CSS, Javascript, and AJAX to the Html Code.
After that, all Ready Component (Grid, Container, Typography, Forms, Menubar) can be used by Copy Paste. If you want, you can also change their style with your Custom CSS Code.
How Bootstrap works?
When Web Designer designs a website with the help of Bootstrap, it does not need to do much coding. Bootstrap already contains lots of codes. Those are only reused on the Html Page.
Bootstrap contains a lot of Predefined CSS Classes that can be easily used on your page. Bootstrap works on the Grid System.
Which divides the entire page into equal columns and rows. Separate CSS Classes have been created for each Rows and Columns which can be used on the Web Page as required.
There are many benefits of using Bootstrap
This framework is very easy to use. If you know CSS and Html then you can use Bootstrap. And you can also change it. This also saves time, Code is already available in Bootstrap. So if you have to make some changes, then you do not need much coding.
Through this, you can easily create a responsive website. If your website is responsive then it adjusts itself according to the screen size in any platform or device. Can use Bootstrap for free.
If you want to change the in-built style already added to Bootstrap, then you can easily do it. You have to write the code of Bootstrap over by writing your CSS code with your CSS code.
Read Similar Articles
- Handling the Microsoft.Online.DirectoryServices.DirectoryValueExistsException
- Download Sample WMV Video Files Free For Testing
- [Fixed]- "the default superclass, ""jakarta.servlet.http.httpservlet"", according to the project's dynamic web module facet version (5.0), was not found on the java build path."
